Recommend Smarter, Faster and More Accurately
Learn how to rapidly deploy resilient, real-time recommenders using the ecosystem.Ai Platform
Introduction #
This lesson outlines the steps you will take to build the configurations needed for your recommender. Go through the steps of identifying the right kind of data for your project, assigning recommender model types, and configuring deployment details. Learn how to then view and analyze your recommender dashboards in order to alter variables and increase recommendation effectiveness.
Recommenders are one of the most commonly used types of prediction when adding intelligence to customer interactions. They can be used for recommending products, messages, design constructs, special offers, and more. A recommendation can be made at any point in a customer journey when there is a choice of what to show to a customer.
They can be difficult to implement optimally in practice. Some of the difficulties are:
- Real-time adds lots of value but it is a very difficult practice to get right.
- As recommendations are often deployed in key journeys, there is no margin for error for up-time and responsiveness.
- Some approaches may require the building and management of a large number of models.
- Giving discounts and other offers can be costly, you need to carefully manage the budget.
- Focusing on a single recommendation option limits the grasp of possibility. Exploration should always be an option to keep up with changing human context.
The Recommender Module is designed to allow you to rapidly deploy resilient, real-time recommenders with a range of Prediction Activator enhancement functionality. This will enable you to keep within budget, maintain the ability to explore deployment environments, use different models in different scenarios and a range of other functionality.
How it Works #
The Recommenders Module uses sophisticated tools that enable you to build more effective vidget (offers) recommendations.
Worker architecture allows for use of the latest modeling packages. Architected from the ground up for durability and performance, it returns results in real-time and is highly resilient. You also have easy deployment to production at the push of a button. There are many ways to structure your recommenders: Multinomial models, collections of binomial models, incorporating an exploration component, and stacked ensembles of recommendations.
The Value of Real-Time Recommendations
Real-time allows you to use the latest information about your customer. Letting you use real-time features such as location, time of day, balance, etc. which aren’t available to batch models at all. Real-time ultimately removes the problems associated with batch-generated offers becoming irrelevant over time. The difference between batch and real-time extends beyond the recommendation itself, in real-time, you will be able to view, analyze and adjust according to the customer response, the very moment it happens.
Recommender Structures
There are a number of different model frameworks you can use in your recommender structure. To list just a few:
- Multinomial models – A single model is built which predicts the vidget that a customer is most likely to engage with
- Collections of binomial models – A model is built for each vidget (offer), which predicts the likelihood of a customer engaging with that vidget
- Incorporating an exploration component – Rather than only presenting a vidget which is predicted to be the most likely to be engaged with, occasionally present other vidgets in a way that allows you to explore whether the human behavior in your system has changed.
- Stacked ensembles of recommendations – The output of one model can be used to inform the next model. For example, one model could recommend a design construct, while the next model sets the messaging within that design.
Let’s Get Started! #

Two main interfaces can be used to access the ecosystem.Ai functionality: The first is the Workbench graphical interface, and the second is by using Jupyter Notebooks. This lesson takes you through the Workbench configuration for Recommenders.
If you would prefer to build your Recommender in a Notebook, head to Dashboard in your Workbench, and click on the Jupyter Notebooks icon. From there, navigate to Documents, Get Started and find “Get Started Recommenders”.

Projects #
Projects are where you will make, manage and keep track of all of the work linked to the completion of any particular deployment project.
When you log into the Workbench you will see example projects that have already been created for you in the Dashboard and Projects sections.

You can edit these projects to set up your own pre-configured first example.
- Simple Recommender
- Offer Recommender Single-Model – which shows how offers can be recommended using a single multivariate
- Offer Recommender Multi-Model – which uses a collection of binomial models.
- Recommender Experiment – which shows how exploration can be incorporated into a recommender environment.
- A Message Recommender – which show how customer engagement messages can be personalized using a recommendation engine.
- More…
In Projects, you can either edit an existing project or add a new one.

To view or edit a project, click on the project name. A section will open below the project list with all the project details.
To create a new project, select + Add Project.

A section will open below the project list where you can input the details of your new project. In Project ID specify a name that everyone in your team can relate to. Add an accurate Description and provide an indication of the Type (eg. Recommender). Specify the Project Purpose. You can also assign dates and humans to the project. This is more for administrative purposes than a necessity.
The Projects Elements dropdowns are for administrative purposes only.

Adding Files, Feature Stores, Predictors, Deployments and Analysis files here will only add the names of the files, not the files themselves.
As you progress with your recommender configurations, you will link items to the project as they are created. Such as the models, frames, simulations and other elements.

Manage Files and Feature Engineering in Data and Features #
The data used to set up your recommender will likely consist of historical information. Whether vidgets have been taken up by clients, and characteristics of the client at the point they were presented with the vidget. Examples of different styles of recommender data sets can be found in the example projects.
Add Data to the ecosystem.Ai Platform
In the Data and Features section of the Workbench, you will find Manage Files.

Here, you will be able to add, view, delete and download the data files available for you to build predictions with.
To upload a file of your own, select + Upload File.

A section will open below the files list where you can input the details of your upload. Files must be uploaded in either CSV or JSON format. Upload and then refresh, the file will appear in your files list.
To download a file, click on the file name.

A section will open up where you can view the details of your download. Click Download and select your download location.
To delete a file, click Delete to the right of the file name.

Deleting a file from here will remove the file from all projects whether active or inactive.
Connect a Database
In the Data and Features section of the Workbench, you will find Feature Engineering. Add a database using connection strings with the Presto Data Navigator.

If you have your own database, you can connect it here. This database access option uses the Presto Worker in the platform. Add a Connection path, similar to this example: local/master?user=admin. Then write a SQL statement to extract the data you want, similar to this example: select * from master.bank_customer limit 2. Then click Execute.
NOTE: IN ORDER TO ADD DATA USING THE PRESTO FUNCTIONALITY, YOU MUST FIRST HAVE YOUR PRESTO CONNECTION ACCURATELY SET UP.
Ingest Data into the Workbench
Ingest data to be used in your projects with the Ecosystem Data Navigator.

Once data has been added to the Platform it must be ingested into a specified database and collection.
You can either select a database and ingest your file into it. Or to create a new database, select + Add Database.

Add a unique database name related to your project. Click the Database button to the left of the input field to create it.

Once your database has been created, refresh the database list and click into it.

To ingest your file as a new collection inside your chosen database, select + Ingest Collection.

Select your file from the file list.

You will see the file name appear above the ingest: input field. Either copy this name or choose a unique one related to your project, then click Ingest to the left of the input.
NOTE: IF THE NAME OF THE COLLECTION YOU ARE INGESTING ALREADY EXISTS, THE NEW DATA WILL BE APPENDED TO THE EXISTING DATA. IT WILL NOT REPLACE THE EXISTING DATA
Once data has been ingested, it must be put into a format in which it can be used by machine learning algorithms. In order to do this, export your Collection to the ecosystem platform. You can then create a feature store from the exported data. Refresh the page if your Collection has not yet appeared on the list.
Find your Collection. Using the Options dropdown to the right of your collection name, click Export.

View and edit the details of your export.

Most of the settings in this tab can remain default. If you are unsure of how much data to export, leave the Number to Export as 0 to export it all. Click Export.

Feature Stores in Recommenders #
Using the collection you have just exported, you will need to create a feature store to be used in your recommender.
In the Recommenders section of the Workbench, you will find Feature Stores.

Here, you will be able to add, view, delete all the feature stores.
To create a feature store from your exported data set, select + Feature Store.

The input fields will be where you set the configuration settings for your final Feature Store.
You will need to provide a unique name in Feature Store ID and a good Description.

The feature store can also be allocated to an existing project to help ease your project creation journey.
Specify the characteristics of the file you will be building the feature store on, and select Check Data.

Clicking Check Data will create a table of all of the columns in your data set. You can change the automatically allocated type of each column on the right. You can also add descriptions to those columns if you wish.
Once you have correctly typed and described the details, the Destination Frame will be pre-populated with your feature store name .hex file.

If you want your feature store to have a different name, you can change it here. This .hex file will be used in the next step when configuring your predictions.
To trigger the creation of your feature store with all these details, select Parse Data.

There is no need to use the small Parse button when configuring a recommender feature store. Make sure to always Save your feature store definition as you progress through the steps.

Predictions #
The next step is to begin making the models for your project, using all the configurations you have set up in the previous steps.
In the Recommenders section of the Workbench, you will find Predictions. This is where you will manage the models for your recommender.

You will see a list of all of previously configured models, as well as be able to create new models. Creating models using this interface is more suited to cases which use a small number of models. Cases where tens, or hundreds of models will need to be trained, are better handled in our Jupyter Notebooks.
To create a new model for your recommender project, select + Create Model.

The details you input here will be used to generate a number of models that can be tested and selected for your project.
You will need to provide a unique Predict ID and Description

You will refer back to this unique ID at any point in the process. You can also link the model to a previously created project in Allocated to projects.
Specify the Model ID associated with this version of the model, and remember to add the version number to the ID.

You will almost always have multiple versions. Assigning a version will ensure you can appropriately track changes, as you experiment with the parameters of your models.
Choose a Model Type from the list of supported model and provide the Model Category.

These details will allow you to more effectively organize your overall model training.
Select the Primary Data Frame .hex file that you created in the Feature Store and update the Version number.
Make sure the number in the Version field correlates with the version number in your Model ID.
Specify the Model Parameters and add notes to be stored with the model that describe the purpose, parameters and other actions.

For the Model Parameters functionality: Clicking Generate Default will generate a list of the model parameters and their default values.

These can be modified to change the behaviour of the model. Examples of model parameter set ups can be found in the other pre-configured example projects.
NOTE: Further details of all of the Model Parameters functionality can be found in the Prediction Workers documentation. Each worker has its own documentation – H2O, PyTorch, Ludwig and Tensorflow.
Notes should include the features you will be using in the model. All of which can be retrieved using Retrieve Features.

Notes should also include the model parameters, as well as a summary of the changes made, in each version of the model.
Save your model configuration in the top right corner, then begin building out you model and viewing the Result, select Generate Model.

This will start the model training, which may take some time to complete. To view training progress, and any interim models being produced, click Result to show the models being trained.
Once models have been trained they will appear in the table

Selecting a model will show metrics on its effectiveness.
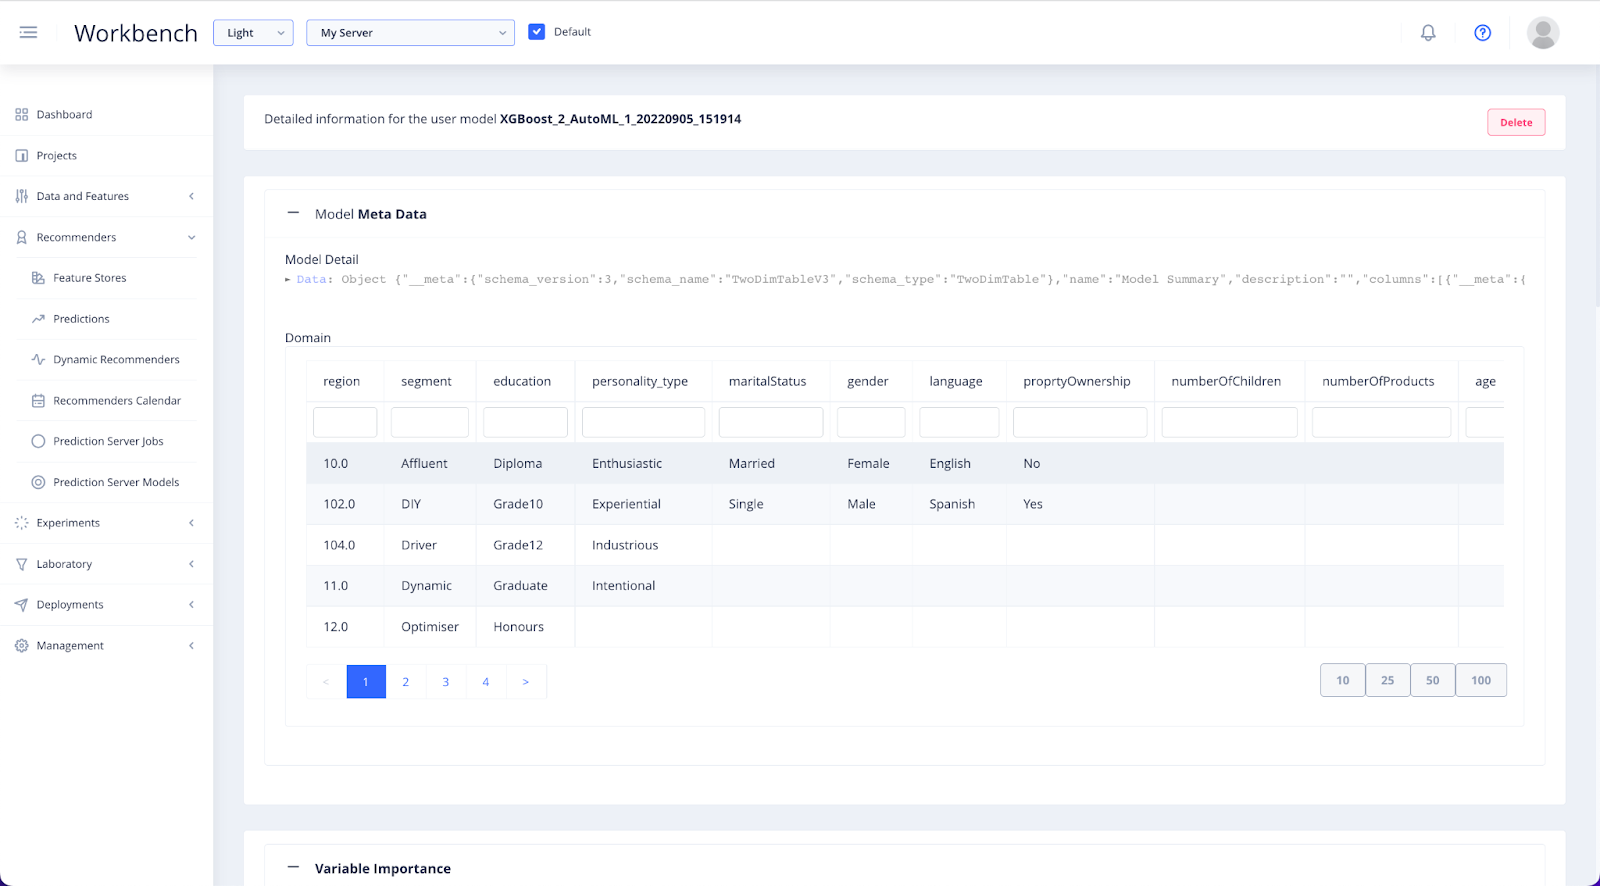
This can be used to select the preferred model, should multiple models be available.
Once a model has been selected save and deploy the model, to have it ready to use in the deployment step.

You can view all deployed models in the window below your trained models list.

Deployment #
Now that you have uploaded, ingested and viewed your data, built a feature store and generated and trained models, you will need to put your recommender into production. The deployment is where you will set your recommender to be used in the Production, Quality Assurance or Test environment.
In the Deployment section of the Workbench, you will find Projects.
This is where you will be able to configure the parameters of your deployment, and push it to the desired environment.
Note: MOST SETTINGS IN THIS TAB CAN BE LEFT WITH THEIR DEFAULT VALUES.
Find your project in the list of projects and click on it to view or create the deployments for it.

To view and edit a pre-existing deployment configuration, click on the deployment name. In order to create a new deployment, select + Add Deployment.

A window will open up below where you can specify the details of your new deployment.
Set the case configuration for your recommender deployment.

Create a unique Prediction Case ID name. Add a Description that is relevant to the specific deployment you are configuring. Add the Type and the Purpose of your deployment. You can leave the type and purpose blank if you are unsure of what to put there.
Then input the properties details and set the Version of the deployment step.

This Version number should be updated every time you make changes to the deployment. Specify the Environment Status in which you will be deploying your configuration. Then input the Performance Expectation and Complexity settings for your set up.
Selecting any of the Prediction Activator checkboxes on the right, will reveal Settings sections relevant to that option, at the bottom of the page.

Select Prediction Model and specify the model that you want to use in your recommender.

Enter the names of the models that you have generated, trained and saved in Predictions for deployment.
Select Parameters from Data Source to access a database.

This is for when you want to get data for making predictions from a database that is accessible to your production environment. The alternative to this, is passing the data through the API. Data uploaded to the platform and ingested, will be available to the recommender in production.
There are a range of different Prediction Activators that can be selected to enhance the functionality of your models.

- Offer matrix is loaded in memory and accessed in the plugins. For the purpose of default pricing, category and other forms of lookup.
- Plugins supports three primary areas: API definition, pre-score logic and post-score logic. There are a number of post-score templates.
- Budget Tracker to track offers and other items used through the scoring engine, and alter the behavior of the scoring system. Must include the post-score template for this option to work.
- Whitelist allows you to test certain options with customers. The results will be obtained from a lookup table. Must include the post-score template for this option to work.
- New knowledge allows you to add exploration to your recommender. This will happen by specifying the epsilon parameter. Epsilon% (eg. 0.3 = 30%) of the interactions will be selected at random, while the remaining ones will be selected using the model.
- Pattern selector allows different patterns when when options are presented, through the scoring engine result.
Note: For more detailed descriptions, go to the Prediction Activators documentation.
When you are done with your deployment configuration, select Push to set the deployment up in your specified environment. No downtime is required.
The Generate and Build buttons are not needed for now, they are designed for Enterprise and on-premise setups.

Testing #
Once you have pushed your deployment configuration you should do some testing to see if the results align with your expectations. There are two ways to test your deployment:
Test your API
In the Laboratory section of the Workbench, you will find Manage APIs. Here you will find a list of all your deployments.

If you have been going through this Get Started using one of the pre-configured examples, click on the relevant deployment to view the details.

If you have created your own Project and deployment, select Create New to make a new API.

Provide the Unique Name of your deployment and click Next to add it to the list.

Select the configuration to view and edit the details of your API. Go to the Configuration tab and select the one you want to test.

Fill in the relevant details of the campaign, then click on the campaign to bring down the API test window.

Click Execute to bring back the API results and ensure your deployment is functioning

Now that you have built, deployed and tested the configuration of your recommender, it’s time to watch it in action.
Build a simulation
In your Dashboard you will find the Worker Ecosystem with links to various accompanying elements.

Click on the Jupyter Notebooks to configure the simulation of your recommender deployment. The steps of how to complete this part of the journey is laid out in the Notebooks.

Monitoring #
Once your recommender is running it is important to keep track of its behavior, and begin to examine the results. There are two dashboard softwares we have linked up to be accessible in your worker ecosystem:
Real-Time Grafana Dashboard
In the Dashboard of the Workbench, select the Real-Time Dashboard icon to go to Grafana, to set up and view the real-time results of your deployment.

Access the Grafana Dashboards for a real-time view of your recommender

Our Grafana Dashboards illustrate the behavior of the recommender in production. Showing which options are being recommended, and which are successful. As well as providing information on performance, and how the recommender is trading off between exploring and exploiting.
To set up your Grafana Dashboard, and link it to your chosen deployment, you will need to login as an admin. We have already pre-built a dashboard for you to view all the most important elements of your real-time deployment. However, if you have experience with Grafana, or are looking to monitor something very specific, you can build your own dashboard: https://grafana.com/docs/grafana/next/getting-started/build-first-dashboard/.
Now that you have logged in, Navigate to the left hand menu, click on the ‘dashboards’ icon and select Manage.

At this point, you will see a list of folders. Select the Runtime2 folder and click on Scoring Dashboard: Client Pulse Responder.

To view the pre-built dashboard configuration. The dropdown menu called Prediction case is where you can see all the deployments linked to this dashboard. Find your Deployment there if you have used one of the pre-configured solutions.
To add a new deployment, go to the Dashboard Settings icon in the top right corner.

This will take you to the settings page where you can manage elements of the dashboard.
Go the Variables in the menu on the left, and then click on Prediction

You will notice in the Custom Options field that the deployments currently linked to this dashboard are listed, separated by commas.
Simply add your deployment case name in this field.

Then click update. When this refreshes, click Save Dashboard on the left, this will link to a popup where you can specify the details of your changes. This is not a compulsory step, but it is good practice to document all changes.
Then click Save. Press the back button in the top left hand corner to go back to the dashboard, give it a minute to load and then you will be able to view your new deployment in the Prediction Case list.
Superset Business Dashboard
In the Dashboard of the Workbench, select the Business Dashboard icon to go to Superset, to view more comprehensive results of your deployment.

Access the Superset Dashboard to view further illustrations of your recommender in production.

The superset dashboards allow you to view and analyze the results of the whole recommendation process. Including costing, counts, successes and fails.


Leave A Comment
You must be logged in to post a comment.